How To Move Website To New Host For Free: Two Easy Ways
2021 March 18
Migrating a website to another provider is not as scary as it sounds and you can do it yourself for free with 0 or minimal downtime.
IntroductionIntroduction
Maybe you don't like your current host or your subscription has ended and you found a better offer, or it's time to upgrade. There are many reasons to move website to another provider.
In this tutorial, I'll show you 2 ways how to move website to a new host for free. So pick the one that's right for you and let's do this together!
Or, if you're a visual learner, my video has every step covered and explained:
Method 1. Automatic Website MigrationMethod 1. Automatic Website Migration
If you have a light website of up to 500MB, the easiest way to migrate it is by using an automated migration plugin. So you will need:
- Your old WordPress website with all the logins.
- A new web hosting account to which you are transferring a website.
- Up to 20 minutes of spare time.
I’ll now show you how to move website from one host to another. It works on any provider, but in my case, I’m migrating my HostPapa WordPress website to Hostinger and using the same domain.
Step 1Step 1. Deleting caching plugins
One of the most common reasons why automatic migration fails is caching plugins. I strongly recommend deleting all of them.
The list includes but is not limited to:
- WP Rocket
- WP Super Cache
- LiteSpeed Cache
- W3 Total Cache
- WP Fastest Cache
- Comet Cache
- Cache Enabler
- Hyper Cache
So if you have one of these or a similar caching plugin, log in to your WordPress dashboard and go to Plugins > Installed Plugins. Then, find your caching plugins and click on Deactivate and once that’s done – Delete.

Now, let’s continue to the actual tutorial.
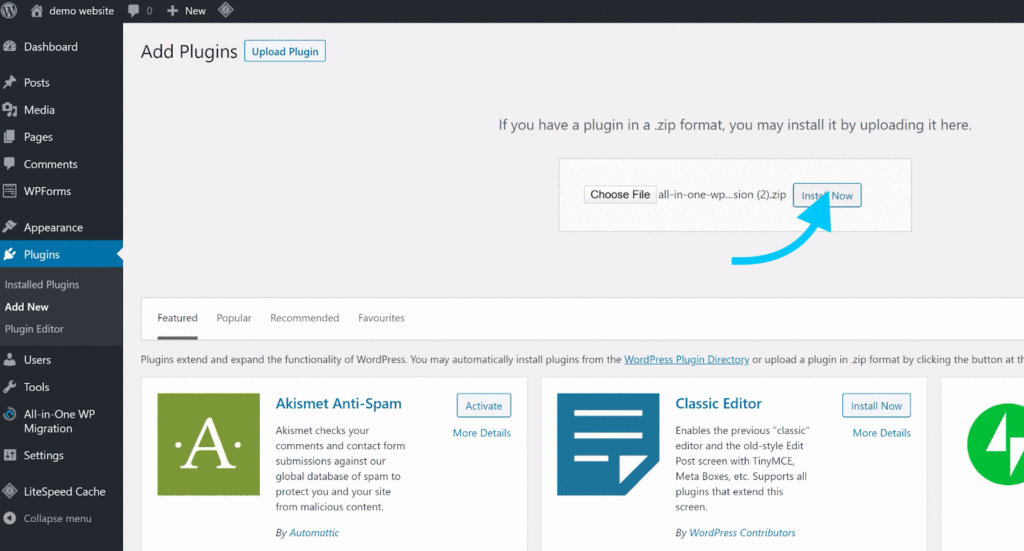
Step 2Step 2. Installing website migration plugin
Now that you've deleted caching plugins, you need to install a migration plugin by going to Plugins > Add New. Search for All-in-One Migration and install it by clicking on Install Now > Activate.

Step 3Step 3. Exporting website
After installation, a new button will appear in the WordPress menu on the left. Hover over All-in-One WP Migration and click on Export.

In the next window, click on Export to and choose File. This will start the file compression process.

After the files are compressed, press the Download button. I recommend creating a new folder on your computer so all of the files are in one place.

The first half of your job is done, so let's get to the next part.
Step 4Step 4. Installing WordPress on your new provider
Now you’ll need to log in to your new provider’s management panel and install WordPress. I have a tutorial where I cover the WordPress installation with every major provider so you can use that.
In case you are migrating to Hostinger, this is what you need to do:
Find Auto Installer’s icon in there and click on it. In the next window, select WordPress.

Enter the required details (domain name, user name, email, website title, and password) and click Install.

After a couple of minutes, the installation will be complete.
Step 5Step 5. Installing website migration plugin on the new WordPress installation
Now log in to the new WordPress and install the same migration plugin you did on the old account.
Go to Plugins > Add New and search for All-in-One WP Migration. Click on the Install Now and then Activate buttons.
However, the plugin only allows importing websites up to 68MB in size. So if your site is larger, we’ll need an extension.
Step 6Step 6. Downloading and installing plugin extension
To increase file upload size to 500MB for free, go to https://import.wp-migration.com/ and Download the file.

Once you download the extension file, you’ll need to install it to WordPress.
Go to Plugins > Add New and choose Upload Plugin. You should select the extension file you’ve downloaded or simply drag&drop it to the WP admin interface. An Install Now button will appear so click on that.
After the installation is complete, click on the Activate Plugin button.

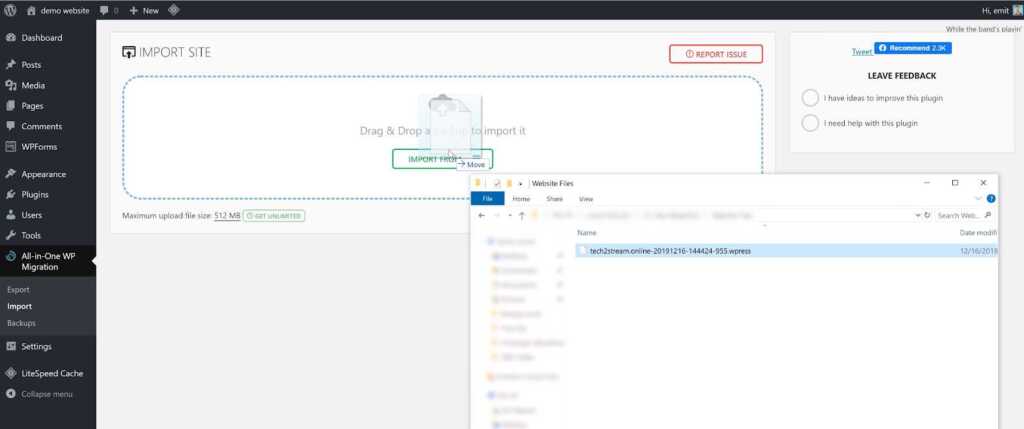
Step 7Step 7. Importing your old website
Just like previously, hover over the All-in-One WP Migration plugin in your WordPress admin menu, but this time, select the Import option.

Thanks to the extension you’ve installed, you can now upload a website that's up to 500MB in size.
So in the interface, select the file you’ve downloaded before and upload it onto your new WordPress.
Depending on your website size, it can take a couple of minutes for the import to finish.
Now, you’ll need to click on Save permalinks structure.

At this point, you might need to re-login or even confirm your email address. That’s because you’ve successfully transferred your website and you’ll need to use the login details from your old account.
So if needed, re-login, and let’s finish this up.
Step 8Step 8. Saving permalink structure
The link you clicked before should redirect you to Permalink Settings. If that’s not the case, go to Settings > Permalinks.
You should use the permalink structure you used in your previous website. In my case, it’s the Post name (and the recommended structure overall).
Don’t forget to save the changes too.

The final step is optional.
You’ll need to do that in case you want to use the same domain name as before.
Step 9Step 9. Updating name servers
If you want to use your old domain name, you’ll need to update your name servers. This process is almost identical with every provider – only the interfaces and values are different.
So the first step is to log in to DNS (domain name system) management system where you are hosting your domain. For example, my domain is hosted with Hostinger.
Here you can see that it points to HostPapa name servers. So if I want to use that domain with Hostinger, I’d only need to click on Use Default and then Update.

But what if you’re using a different provider?
Well, you’ll first need to find the name servers of the provider where you are hosting your transferred website. Usually, they can be found in the control panel but I like to contact the support and ask them if I cannot locate name servers immediately.
Next up, you should simply enter those new values in your DNS and click on the Update button.
Generally, you can use any domain registrar and point name servers to the provider you want to host your website with. As you saw, I had my domain name with Hostinger and the website was hosted on HostPapa. Now I have both domain name and website with Hostinger.
So you can mix and match them however you like. One thing you should keep in mind that after you update your name servers, it can take up to 24 hours for your domain to start working. Usually, it’s no more than half an hour, but it’s better to play it safe.
Method 2. Manual Website TransferMethod 2. Manual Website Transfer
If your website is bigger than 500MB or you simply don’t trust plugins, manual migration is not as scary as it sounds.
In my case, I’ll be transferring my HostPapa website with a domain tech2stream.online to a brand new Hostinger website with a domain tech2steam.com. Don’t worry, you can keep your old domain, certain steps will be optional for you then.
For this method, you'll need:
- Your old WordPress website with all the logins.
- A new web hosting account to which you are transferring a website.
- Up to 40 minutes of spare time.
- New domain name (optional).
Let’s begin.
Step 1Step 1. Downloading website files
To download your website files, you’ll need to reach the File Manager in your cPanel or any other website management panel.

In the File Manager, your website folder will be named like your website or just public_html. For me, it’s tech2stream.online. In any case, we are looking for a folder with all these “wp” files.

Once you locate the folder, click on Select All and then pick the Zip Archive option. You can optionally rename the file into “website transfer” or something similar. Press Compress Files once you are done.
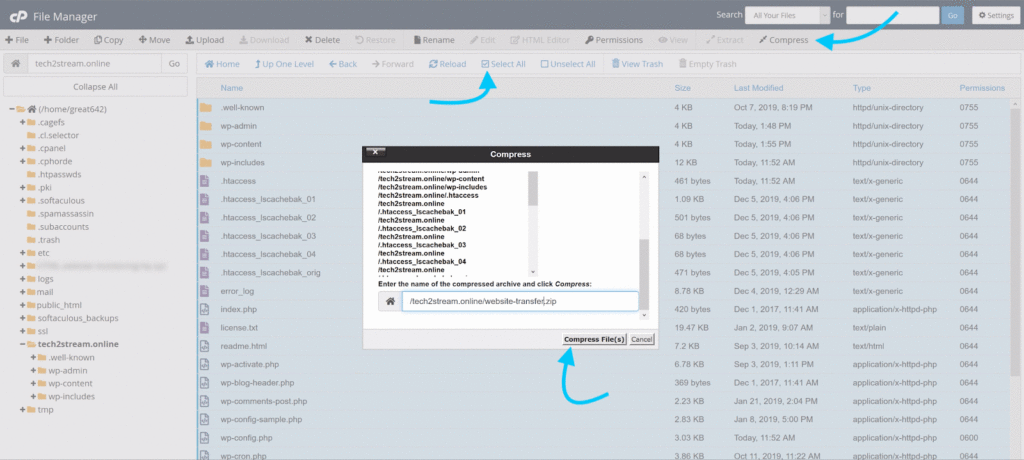
Once the compression is complete, click on the newly created zip file and download it to your computer. I recommend creating a new folder for website transfer so nothing gets lost in the process.

Step 2Step 2. Finding the correct database
While you are still in the file manager, we can locate the database that your website is using. This is especially the case if you have more than one website.
In the File Manager look for a wp-config.php file. Select the file and click Edit and then Edit again.

Now, you’ll need to locate the line with “DB_NAME.” Here it’s great642_wp717 so this is exactly the database I will be downloading.
Step 3Step 3. Downloading the database
Now that we know which database belongs to your website (in case you have more than one), we can go ahead and download it from the phpMyAdmin. Go there.

In the phpMyAdmin, select the correct database and scroll to the bottom. Click Check All and go to the Export tab.

A new window will open. Simply click OK and you’ll be able to download the database.

So now you have all the files and data of your website. It’s time to start uploading everything to the new provider.
Step 4Step 4. Installing empty WordPress on your new provider
Super simple, just log in to your new provider’s control panel and find the installer of WordPress.
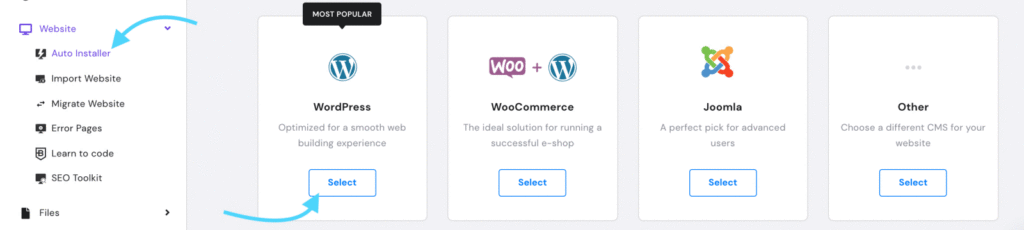
I’m using Hostinger so the process is very simple. I just need to enter the required details and click Install.

In a couple of minutes, you should be able to reach your new WordPress website and it should be completely empty.
Step 5Step 5. Find the new database
With the installation, a new database was created. We need to find out how it is called if you have more than one website.

So find the File Manager of your new host and locate the wp-config.php file. Select the file and click Edit.

Once in the editing interface, you’ll need to locate the “DB_NAME” line. In my case, that’s the one with “ouazH”

Step 6Step 6. Deleting data from the new database and importing old database
Now that we know which database is linked to the newly created website, we can go to that database and delete its files. Go to phpMyAdmin, and click Check All. From the drop-down list, select Drop.

A bar will appear so click Yes on that.

Now, your database is empty and we can upload the old one on it.
In the same database, select the Import tab and pick the .sql file you’ve downloaded from your old provider.

After the upload is done, click Go to finish.

Step 7Step 7. Editing database
This step is for those who are using a new domain.
In the same newly imported database, find a table called options. Click on it.

It holds 2 values that are important to you – siteurl and home.
If you are using a new domain, change both of these values to your new domain. In my case, I’m changing https://tech2stream.online into https://tech2stream.com. Also, if you have SSL on your new website, it should be https. If not – http in both of these fields.

Now that we are done with the databases, it’s time to upload your website contents.
Step 8Step 8. Saving the new wp-config.php file and deleting all files
The new installation of WordPress has its own files. We need to keep the wp-config.php file so there's less editing required and delete the new files.
Here's how it's easiest to do it all:
Go to the File Manager of your new host and find the wp-config.php file. Click on it and save it to your computer.

Now you’ll need to select all files and delete them.

Step 9Step 9. Uploading old files
Now that your website folder is empty, select Upload files and upload the .zip file that you downloaded from your old File Manager.

After uploading, select the .zip file and Extract its contents.

Step 10Step 10. Deleting unecessary files
For a website to be fast, there must be no additional files. Select the extracted .zip file and click on Delete.

Because we will need the new configurations, we need to delete the old wp-config.php file. Select it and click on Delete.

Step 11Step 11. Uploading the new wp-config.php
Now you should click on Upload and add the wp-config.php file that you’ve downloaded before.

With this step, your website files are all on your new provider. However, we need to connect them to the database.
Step 12Step 12. Finding database prefix
Go to the phpMyAdmin and check the left menu. Here is the prefix of the database. In my case, it’s wpk0. Write yours down/copy/memorize it.

Step 13Step 13. Connecting website database to files
To connect the database with the files, go back to the File Manager and find your website’s wp-config.php file. Click to Edit it.

In the editing window scroll down till you find $table_prefix line.

Add your database prefix here like this:

That’s almost it and you should be able to see your website as well as to login to your WordPress admin interface.
However, we still need to fix all of the URLs if you were changing the domain name.
Step 14Step 14. Updating URLs
First of all, go to the Plugins > Add New and look for Go live Update URLs plugin. Install and Activate it.

The plugin will appear under the Tools >Go Live. Click on it.

Here, scroll down a bit and enter your old and new URLs in the fields and click on Update URLs.

That’s it! Your website now is exactly the same on your new provider as it was on the old one.
The only thing you might need to do is transfer the domain if you decided to use the old one. In that case, go back to the domain transfer section and follow the instructions.
This pretty much covers it all. These were the 2 ways on how to move website to new host for free and I hope everything works out well for you.
Also, let me know how your migration went in the comment section down below and in case you have any questions, you can leave them there as well. I'll try to answer them when possible.
Also mentioned in:
Hostinger Review – Has The Fame Ruined My Favorite Host?HostPapa Review – The Canadian Web Hosting PrideHow to Install WordPress – Every Major Provider Covered